Final Report
Abstract
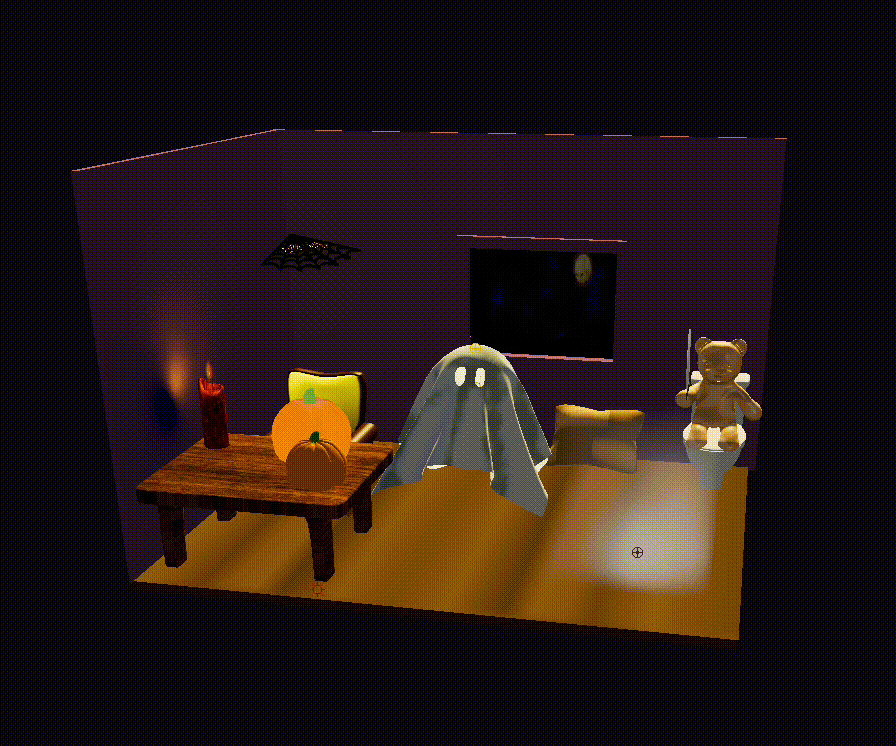
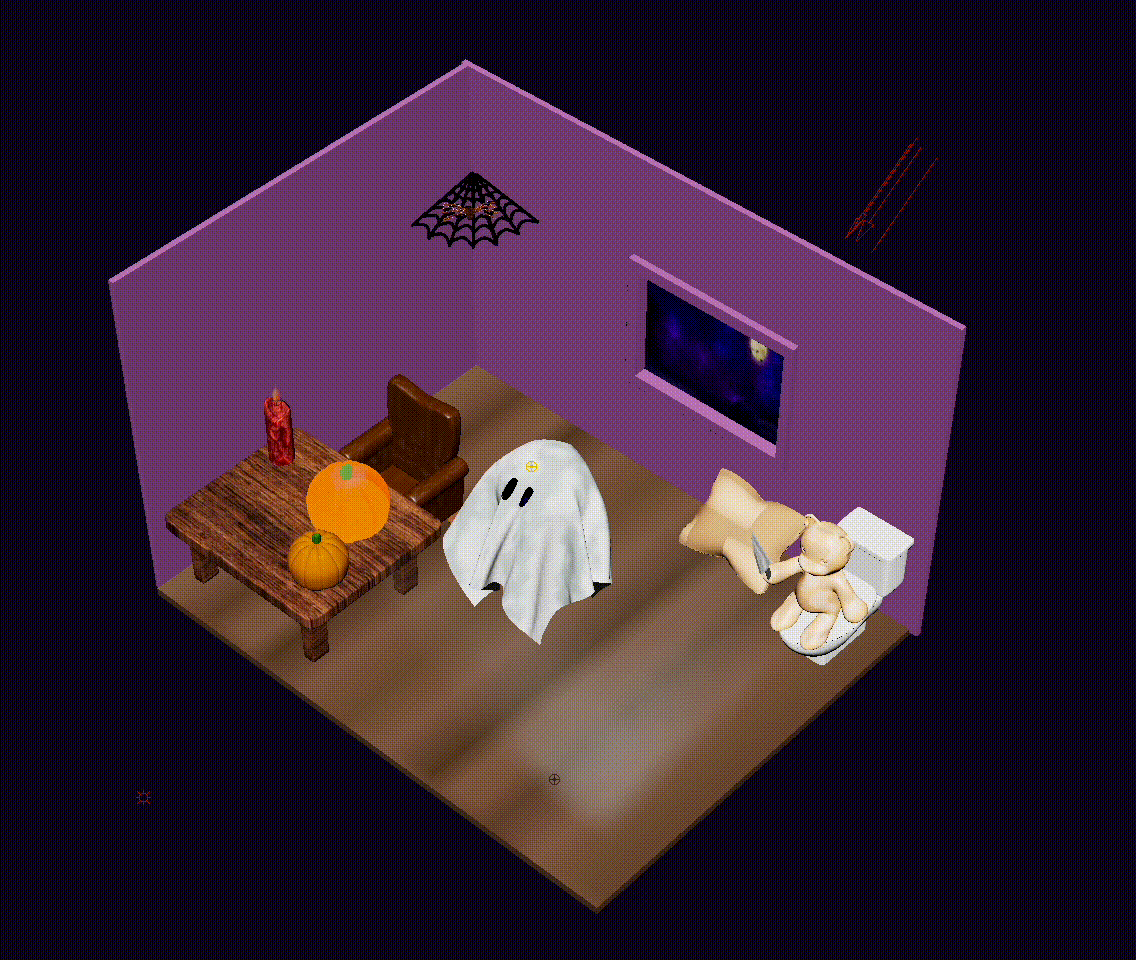
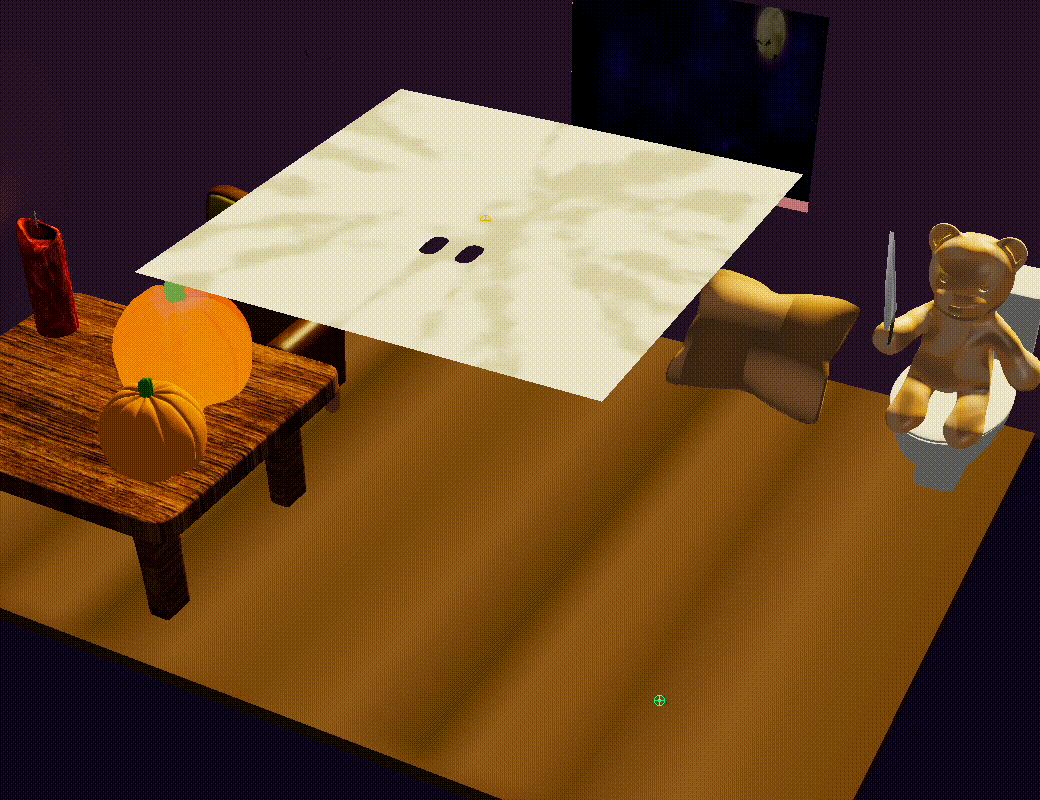
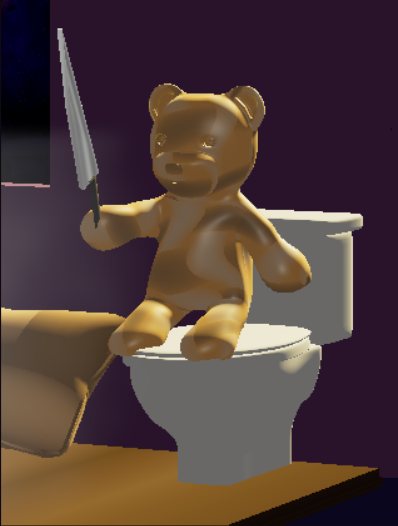
spooky…boo! In our final project, we created a spooky Halloween animation in Autodesk Maya by integrating both dynamic and stationary objects impacted by environmental factors like wind and light shadows to our entire scene. Specifically, this included various components such as our ghost protagonist, Ghosty, moving in the breeze, alongside a wood-textured table and chair set, a hairy spider, a ceiling cobweb, a flickering candle, an illuminated pumpkin, and fog that slowly fills up the room. To the side is a version of Oski sitting on the toilet, suspiciously holding a knife. We ran into a series of obstacles throughout this project where we started with building off of Homework 4’s ClothSim by creating our ghost cloth and wind simulation. After realizing that it’d be unfeasible to continue on that platform, we migrated to Autodesk Maya and Unity to take advantage of Unity’s Universal Render Pipeline and Maya’s Maya Vector Renderer, allowing us to solely focus on the detail of our models and the visual appearance.
Technical Approach
HW4 ClothSim
Wind
We first added wind simulation by modifying Cloth::simulate in cloth.cpp. The idea is to add wind to external_accelerations, similar to adding the impact of gravity. Wind is defined as a force that acts on the cloth.
In the loop where the point mass positions are updated at each time step, we use the following formula below to calculate wind force which is then added to pointMass.forces.
- \(F_{\text{wind}}(i,j)\): Force of wind at position \({(i,j)}\)
- \(C_{\text{wind}}\): Constant that changes overall wind force
- \(n_{i,j}\): Normal with
pointMass.normal() - \(v_{\text{wind}}\): Velocity of the wind
- \(v_{i,j}\): Velocity of the object at position \({(i,j)}\)
Ghost Cloth
- Blinn Phong Shader
- Coefficient changes:
- Diffuse: No change (wanted to keep the white color)
- Ambient: Changed to
0so that the base color is black - Specular: Increased it
- Increase density in GUI to
30 g/m^2to make it slightly heavier - Decrease
k_sto500 N/mfor a tighter spring:
- Coefficient changes:
- Bump mapping: Downloaded a pic of a bed sheet to mimic the nature of a thin sheet without having to render each fiber
- Extra parameters
- Used this article to learn about different material types and as a baseline of what to have the different values equal to
- Sheen: Color of our reflection
- Set to lighter shade of white to appear brighter
- Roughness: Set high since we wanted light to be evenly spread
- Backscatter: Light scattered throughout the entire object
- Provides soft effect
- Edginess: How far the sheen spreads across the surface
- Set it high to show brighter borders on surface edges (drastic fade)
- Sheen: Color of our reflection
- Used this article to learn about different material types and as a baseline of what to have the different values equal to
- Changed the length of the cloth to be longer and resemble the shape of a ghost
Pivoting to Unity
After realizing that we’d be unable to import our Maya models into the HW 4 ClothSim, we pivoted to learning how to work with Unity. This involved watching countless tutorials to understand the interface and how game development worked.
3D Modeling
We primarily used Autodesk Maya, a 3D computer graphics application, as the main tool for rendering objects in our scene. We individually modeled and rendered each object, then combined them into one cohesive scene with a background as our final product. After learning how to use this platform, we discovered all of the features it had and Autodesk Maya seemed like a natural choice because it sped up the implementation of ideas from HW 4 like lambertian shading and the application of textures to object surfaces.
Ghost
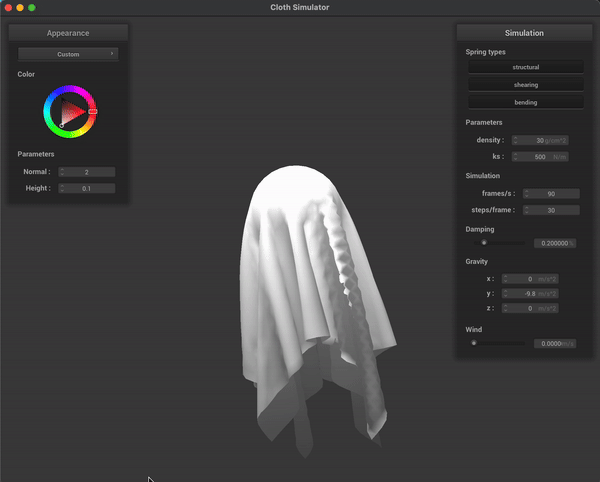
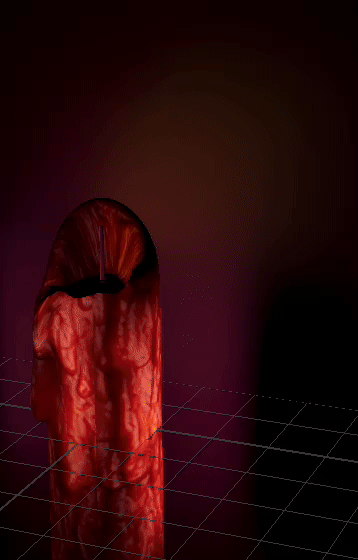
For creating the ghost, we used the approach from shaders (Homework 4 Part 5), where we created an animated “n-cloth”, added a couple of holes in it for eyes by deleting individual cells in the cloth, and passively collided it with a stationary sphere (similar to our HW 4 ClothSim). By modifying friction and gravity parameters, we were able to get it to drop onto the sphere and stay there in a “ghost-like” shape. We also added a “t-shirt” texture to make it a more realistic material and color. Then, by modifying the visible frames and adding wind parameters, we were able to get the ghost to resemble cloth moving in an animated way without needing the cloth to be dropped. We also used the point sculpting tool to make the eyes more droopy, smoothen out wrinkles in the cloth, and make the shape overall more realistic.
Candle
One particularly hard model to create was the candle, since we wanted to make it seem like the candle was dripping wax for a more realistic effect. This required features such as soft select to fully mold the dripping wax to be as realistic as possible. To add the flickering, we used the fluids effect on Autodesk Maya, which creates a fluid emission within a bounding box. By tweaking parameters such as dissipation, tension, and buoyancy, we were able to shape the flame into a more realistic structure and have it phase in and out of opacity and transparency. We also added lighting into the flame so that it would cast light and corresponding shadows into the surrounding environment. Lastly, we added a texture to the candle base using an imported image to fully replicate it’s real-life appearance.
Fog
Since we were individually modeling various aspects of the scene, this allowed us to all learn how to use Autodesk Maya. Specifically, the candle and fog both utilized the fluids effect but in slightly different manners. The 3D container adds an emitter by default which is the source of the fog/smoke. By modifying the container to fit the size of our scene, this enables the fog to slowly fill up the room to create a more ethereal effect. There were a variety of parameters that were tweaked such as dissipation, diffusion, buoyancy, noise, turbulence, velocity, etc but the most impactful attribute was the density scale since this controlled the amount and severity of the fog within the room.
Other 3D Models
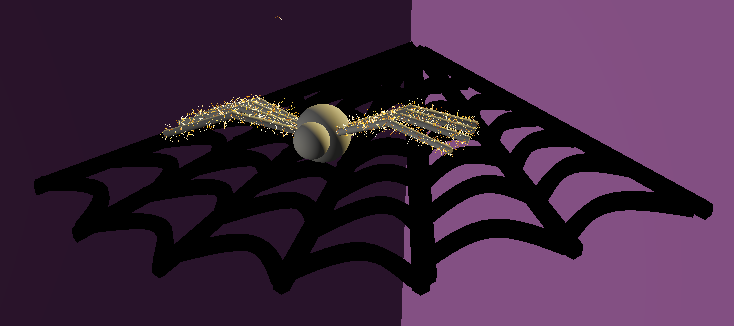
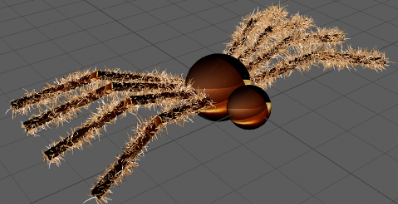
After modeling a spider in the scene, we added details such as hair using the XGen Interactive Groom Editor in Autodesk Maya, a built-in feature which creates hair-like strands on a selected surface. The editor enabled us to change parameters like taper, width, height, and noise, allowing us to emulate the short hairs on a spider like a tarantula.
With more familiarity in using the platform, we relied less on referencing modeling tutorials and instead created the 3D representations ourselves which includes:
- Table and chair set
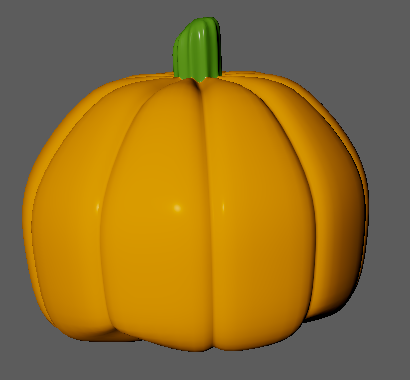
- Pumpkin
- Spider
- Cobweb
- Window
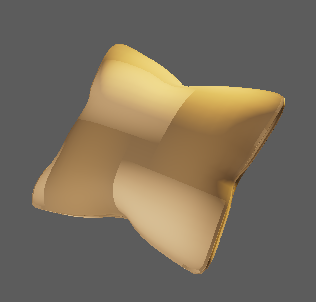
- Pillow
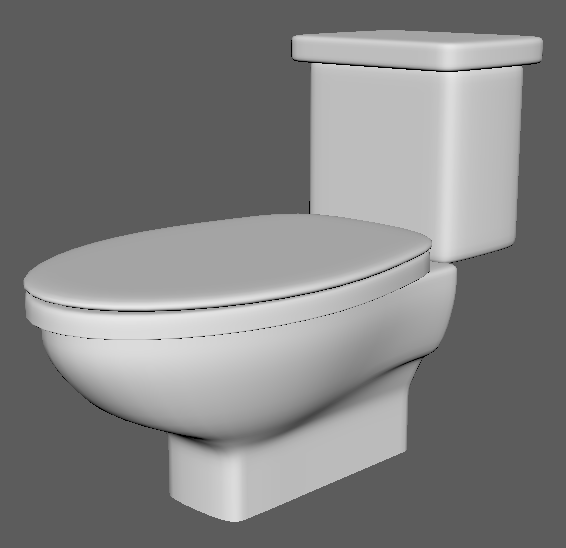
- Toilet
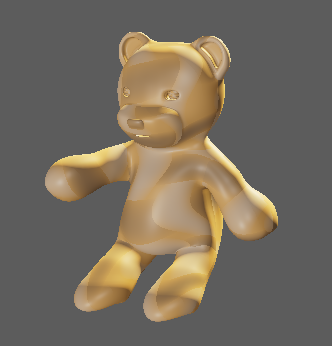
- Stuffed bear
- Knife
Challenges
As this was all of our first times working with Autodesk Maya and Unity, we ran into a number of challenges:
Ghost
In terms of making the ghost move with wind, we had trouble finding the correct wind speed and direction as well as trying to animate an object after deleting object history. Since the cloth started above the sphere and dropped onto the cloth, the wind effect caused the cloth to often fall off-center. The eyes would also get covered if the wind speed was too intense. After playing around with the parameters, we found the optimal sphere position and wind X direction for the ghost shape to look symmetrical.
We ran into several issues using OpenGL to make different shaders and textures, in addition to applying them to the models in Maya. For example, we were able to make two different shaders for the ghost — one involves fully custom values and creating the shader from scratch, while the other is a texture shader that applies an image to the object.
Essentially, Maya allows us to use a rendering system called Viewport 2.0, in which we can use the engine “OpenGL - Core Profile (Strict)”. We could also load in the glslShader plug-in for the full functionality. With this, the software allows us to assign a new material to an object with a GLSL shader. However, within this shader, it wants an input of an .ogsfx file instead of two separate .frag and .vert files that we are accustomed to. This led us on a trail of (somewhat) useless pages of Maya documentation, which unfortunately did not have the adequate information that we needed (though we have put these various links in References below). The .ogsfx files almost had their entirely distinct syntax and the documentation for it was very sparse. We were actually able to create a .ogsfx file for our textured shader that we created for the ghost, but even after hours of research and coding, we were unable to do so for the custom shader. Therefore, we just ended up applying our GLSL texture shader to some of the objects in our final scene.
Flickering Flame
In our original implementation, we attempted to draw inspiration from code found from ShaderToy within our HW 4’s codebase to create a new shader producing an animated flame with flickering light. Realizing that it would be difficult to integrate our other components, we switched to Autodesk Maya, on which we modeled a candlestick and simulated a flame using FX fluids. In the fluid, we changed parameters like buoyancy, tension, and dissipation to simulate the movement of a flame as it is impacted by wind.
Spider
We worked with Maya’s XGen Interactive Groom effect to add and tweak the hair found on a spider’s legs. We changed parameters like noise, taper, width, and length for the hair on the spider’s legs as well as added a Lambert texture to the spider’s body.
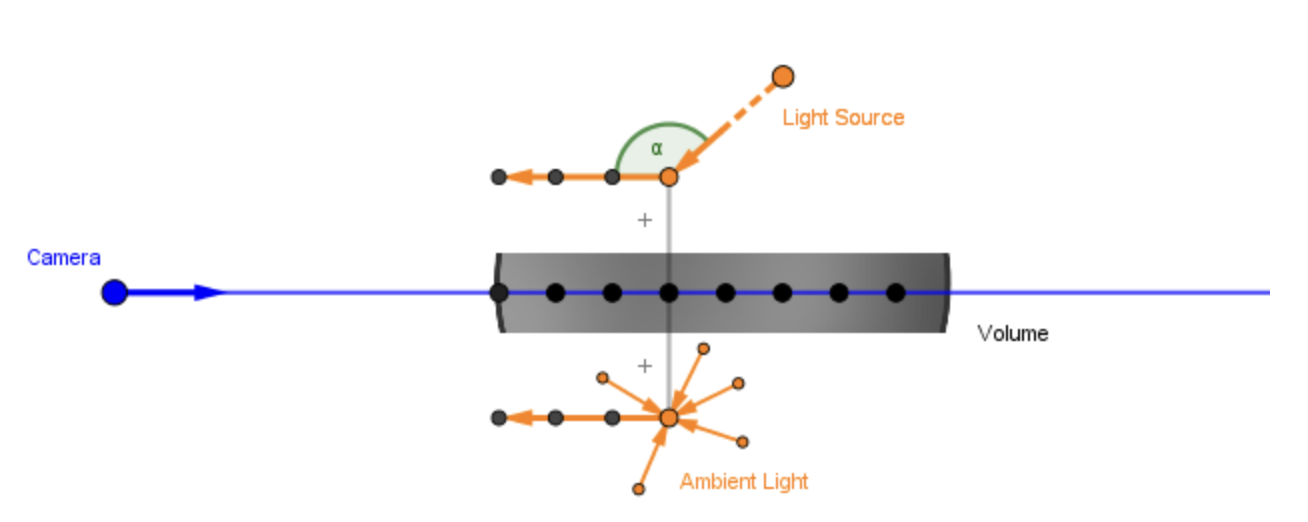
Volumetric Fog
In essence, volumetric fog is a rendering feature that simulates light transmission through a scene that contains fog. This [paper] (https://cglearn.eu/pub/advanced-computer-graphics/volumetric-rendering) is a phenomenal explanation of how the various aspects work together.
Unity
Since we had zero experience with Unity, we attempted to watch a few tutorial videos because we had no idea what language the platform utilized, let alone how to navigate through the user interface. After understanding how Unity (somewhat) worked, our plan was to integrate our Maya models into one scene then import that .ma file into Unity. This would allow us to add the physical effects on our components as desired (ex: wind) because if we did that in Maya, the differing animations for each individual object would overlap.
However when attempting this, more problems arose. For instance, models were imported into Unity with obvious aliasing that we couldn’t fix and textures would get manipulated incorrectly. Since each model was imported as an entire object, we weren’t able to directly work with individual components of the object (ex: stem of the pumpkin).
We referenced countless videos, tutorials, and papers (see References) to attempt salvaging all of the hard work we had already done but we were unable to fully incorporate the volumetric fog with our prototype models. After utilizing this Unity tutorial, we attempted incorporating all of the different fog types (linear, exponential, depth-based, etc) into Unity.
Autodesk Maya
After realizing it was near impossible to figure out integrating volumetric fog with our terribly imported Maya models into Unity, we pivoted to using Maya. The biggest problem was adjusting the parameters to make the fog look realistic since the 3D container prohibited the smoke from traveling upwards, but the density needed to be high enough so the fog would be visible.
Unity vs. Autodesk Maya
After suggestions from multiple TAs, we attempted to integrate volumetric fog in Unity because it is one of the preferred platforms for game development. Since this would ultimately result in a visually appealing outcome, we decided to take the risk and attempt to learn two new platforms. Our plan was to first model everything in Autodesk Maya and attempt to have them as detailed as possible, intending for us to have “less” work in Unity after importing the Maya models.
Unity (typically used for game development) resulted in having too steep of a learning curve even though it was initially recommended for helping make a cohesive scene. We realized that Maya supported applying external forces (eg. wind, fog) to individual objects, and supported importing multiple existing Maya models into a single scene — hence why we tried to do everything in Maya.
When attempting to integrate the Maya models to Unity, the first issue we ran into was having our Maya models imported incorrectly – the pumpkin for instance ended up being very “spiky” despite not appearing that way in Maya. Issue after issue, we had hope that Unity would end up being a possibility but it ended up being unfeasible.
Lessons Learned
We learned a lot in this project! Here are a few:
- Modeling on Autodesk Maya and developing on Unity.
- Though technology is incredibly advanced these days, integration is not seamless.
- Animation is fun - there are a lot of creative avenues!
- Organization of models into its components to make “debugging” our models simpler
- Choosing the right parameters (e.g.
density,diffusion,noise) is really important for realistic simulations. - Pair programming is difficult when modeling/animating.
The majority of us were new to Autodesk Maya as a development platform, so it took a bit of time to get used to the various tools, including how to add surfaces, translate/rotate objects, n-cloth properties, curves, fluids, hair simulation, and other external effects. Modeling the objects also proved to be quite challenging, especially since Maya has such a steep learning curve. There are countless tools to use, and even with following some tutorials, it took a bit of time to get used to the software. But ultimately, we can to appreciate Maya’s highly personable interface — it allows you to make customizable animations and models — we found that the best way to add as much detail in our scene was rendering each object individually with as many details and effects as needed before combining with other objects to ensure effects and textures are only applied as necessary.
We attempted to use the HW 4 starter code but ran into a number of issues with trying to merge shaders, textures, and models; we switched instead to Autodesk Maya so that we could more seamlessly integrate models with textures, shaders, and other effects.
We can use effects like fluids, n-cloth, n-nucleus, and XGen hair simulation to make our scene more realistic; for example, we used fluids to emulate a flame and XGen to emulate the hair on a spider’s body. We also imported images as textures for other objects in our scene, such as the table and the chair.
We learned the different capabilities that Maya has with adding custom shaders and textures. For the .ogsfx files, we learned how to write the corresponding syntax, and how we might have to edit the .frag and .vert files to get to the correct file type.
While there is some overlap between software development and game development/animation, one observation is the inability to pair-program when modeling. We noticed during group worksessions that it was helpful to bounce ideas off of one another or ask for modeling tips but unlike general software development practices, it’s nearly impossible and inefficient to “pair-model” (for the lack of a better term). Additionally, modeling took up a significant amount of time due to our lack of experience.
Final Results
For our final results, please watch our demo video above — you can also see the animated ghost and candle in action! We’ve also included texturized versions of all the models for the individual components in our scene, to show all the colors, shaders, and details in normal light. In particular, we wanted to draw attention to the hairs on the spider’s legs, the strands that compose the cobweb, and our custom GLSL shader for the pumpkin, since these aren’t as visible in the demo video.
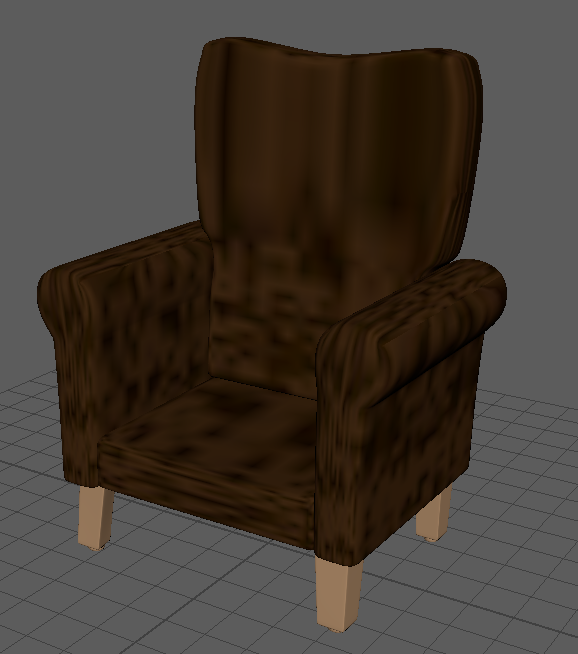
| Table | Chair | Pumpkin |
|---|---|---|
 |
 |
 |
| Cobweb | Spider | Pillow |
|---|---|---|
 |
 |
 |
| Toilet | Stuffed Bear | Knife |
|---|---|---|
 |
 |
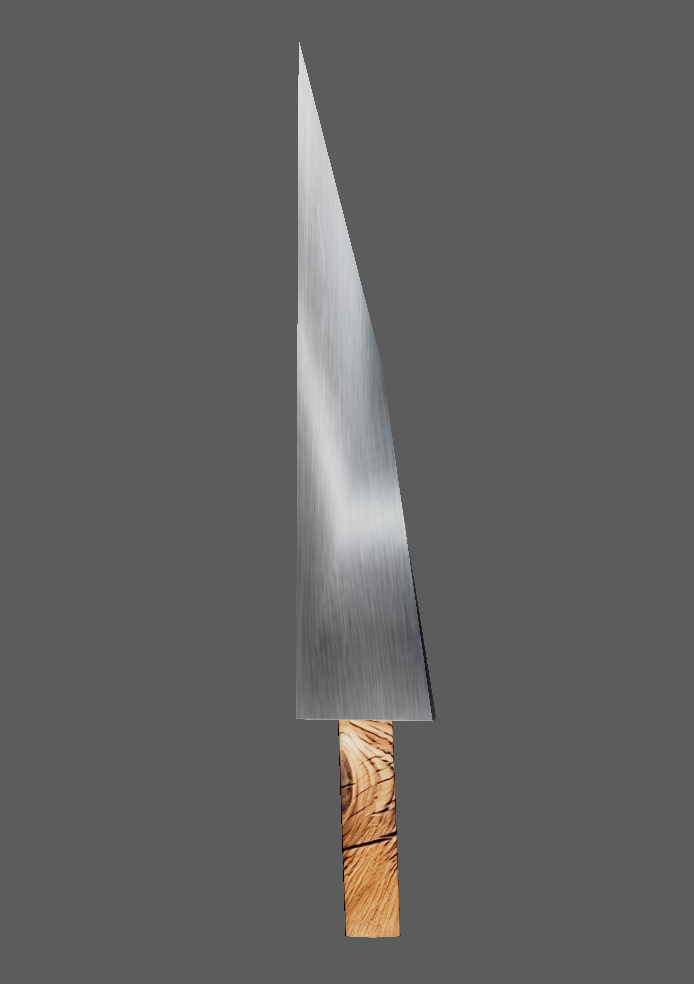 |
In the models above, we capture the primary realistic features within our scene! You can see the textures and shaders incorporated within each model, as well as the environmental effects on them.
Unity Results
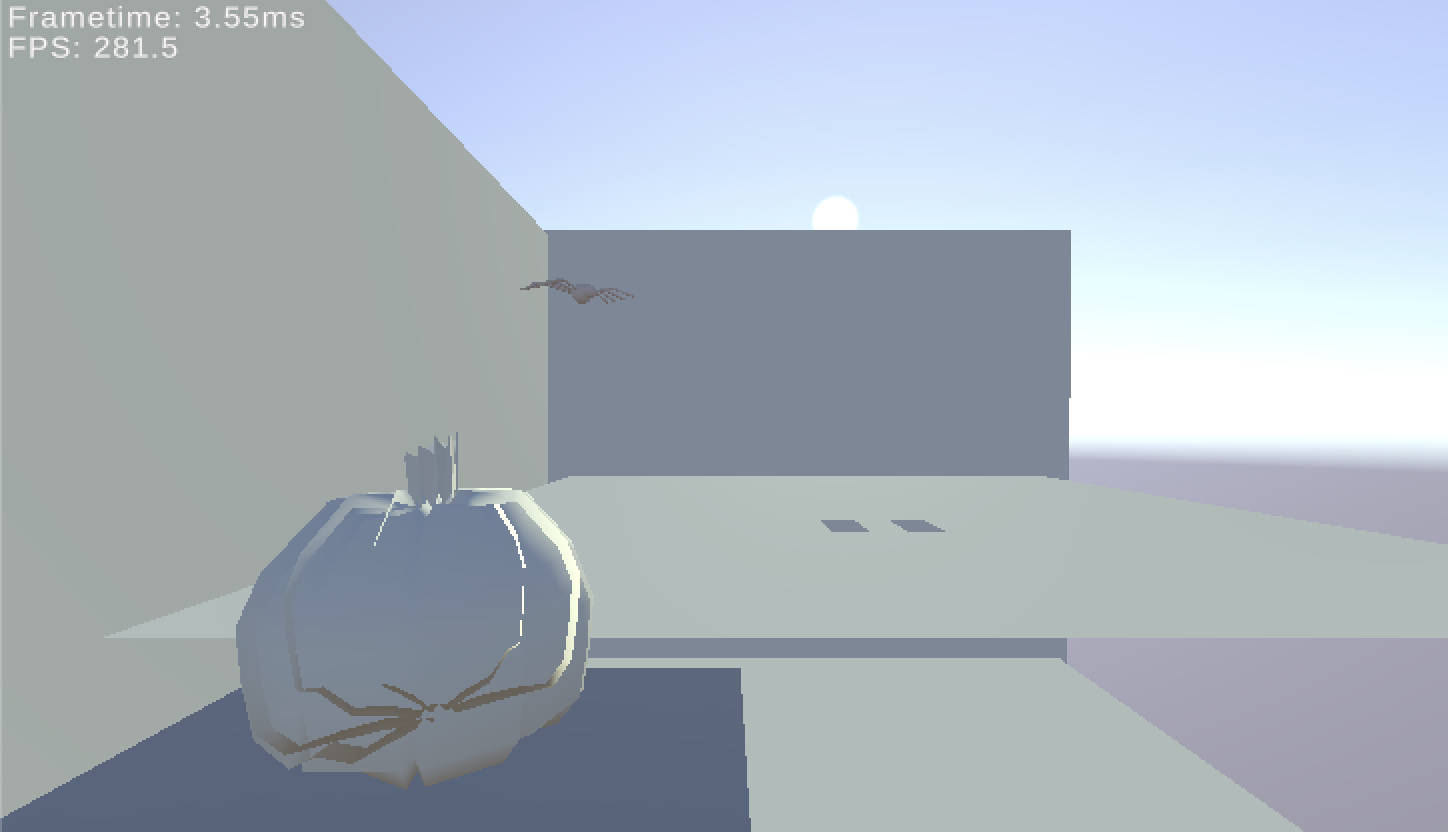
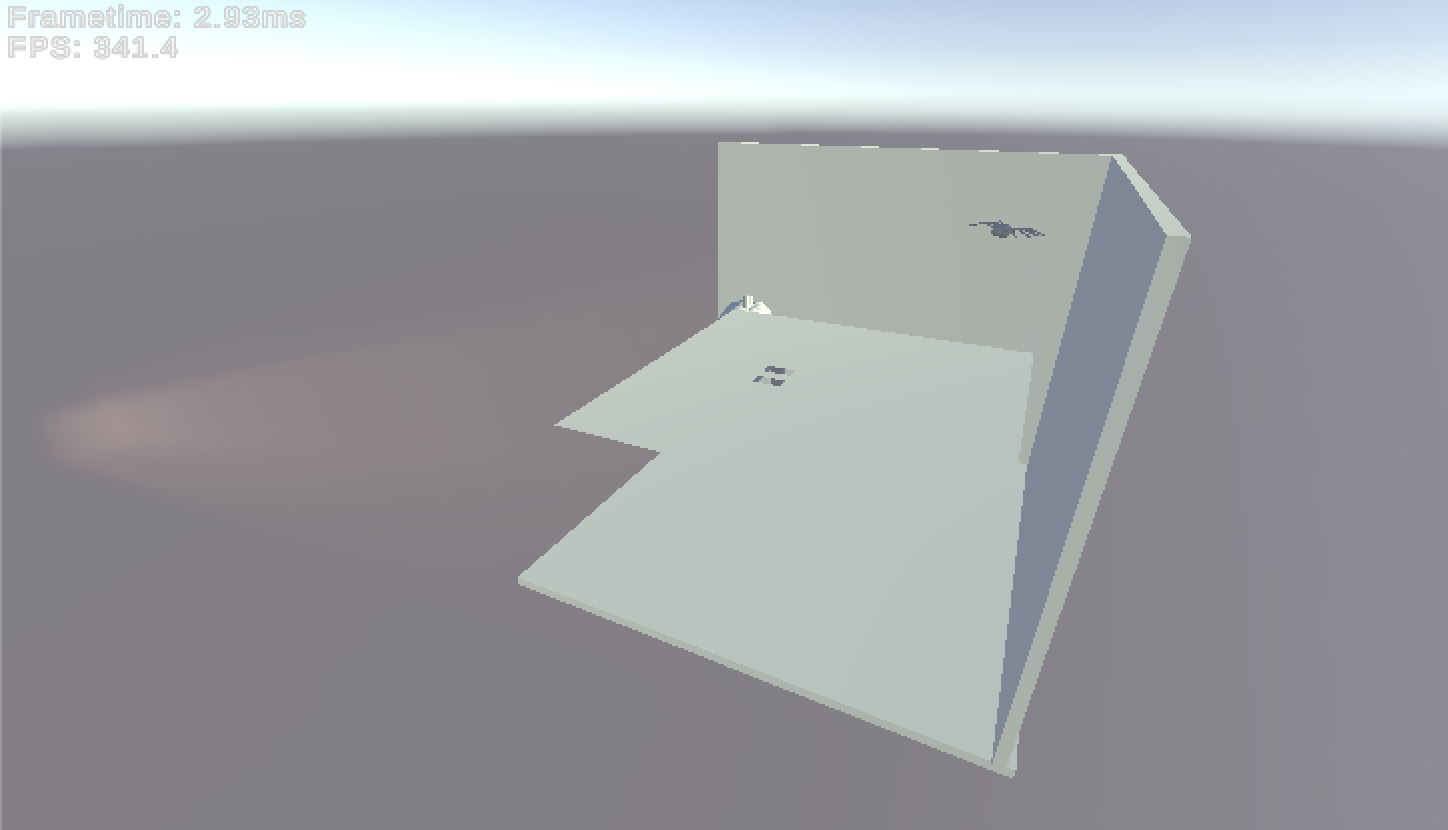

Our results from working on the HW 4 codebase are shown above but immediately afterwards, we pivoted to working on Unity. As seen in the top left image, there is obvious “spiky” from the pumpkin’s surface, the textures aren’t imported in, and the ghost’s animation is missing as well. On the top right, we attempted to incorporate the sun’s ray shining on the scene but there were too many bugs faced.
We drew inspiration from another shader created and implemented in-scattering into the codebase. It is visually appealing but the biggest problem still existed - being able to integrate our own Maya models into Unity. Due to time constraints and being unable to fully integrate them, we switched to Autodesk Maya.
Scene Highlights
References
We utilized a lot of tutorials initally and referenced documentation on how the tools in Autodesk Maya and Unity worked. When initially building on the HW 4 ClothSim and Unity, we referenced papers as well.
- Autodesk Maya Help Pages
- GLSL Resources
- Using the include directive in an ogsfx file to load your vertex and fragment shaders
- Convert existing GLSL shaders to OGSFX format
- Write a custom GLSL shader: texturing, transparency, lighting and hardware selection example
- Semantics and annotations supported by the dx11Shader and glslShader plug-ins in Viewport 2.0
- Autodesk Maya Modeling Tutorials/Inspiration
- Volumetric Fog
- Autodesk Maya Python Scripting
- HW 4 Cloth
Contributions
-
Christy Quang: I worked on building off of the HW 4 codebase initially by incorporating wind simulation to our cloth, as well as creating custom shaders to realistically represent the ghost cloth and sheen. After discovering that continuing on this codebase was unreasonable, we migrated completely over to Autodesk Maya where I added textures to our models. A majority of my time was spent trying to incorporate our Maya models into Unity but this ended up being infeasible and unrealistic since the imported models were not as visually appealing as they were in Autodesk Maya. Instead, I added fog to our Maya scene and contributed to the writeup, video, and slides for our milestone and final presentations, as well as hosting/updating our website.
-
Anya Agarwal: I modeled a lot of the objects, such as the table, candle, chair, and pumpkin. I also worked a lot of researching and attempting to put our GLSL shaders into Autodesk Maya to apply them to our models. In the end, I created a few textured shaders written in a
.ogsfxfile. I helped assemble and add the final shaders to the final scene, as well as contributed to the writeup, video, and slides for our milestone and final presentation. -
Tia Jain: I made the ghost by colliding an n-cloth with a sphere, tweaking parameters like wind, friction, damping, gravity, and texture to get it looking right. I also modeled the knife for our bear to hold. I helped combine the animated ghost with the table and pumpkin, as the first step in making it a cohesive scene. I also worked a lot on the milestone and final deliverables, describing our overall project and technical details.
-
Janani Sriram: I created the fluids effect on Autodesk Maya for the candle flame, including tweaking parameters like tension, dissipation, and color to create a realistic visualization of a flame. I also modeled and textured the spider with a Lambert shader and the XGen Interactive Groom tool for hair on the spider’s legs. In addition, I modeled the spiderweb at the top left corner of the scene. Lastly, I helped compile the individual attributes of our scene into a final product, as well as contributed to the writeup and video.